File Prep
Tips, tricks, and templates to get your files print-ready.
Download and follow the instructions for file setup with the corresponding program/application.
- What is Print-Ready?
- Bleed
- File Types
- Formatting and Layout
- Image Resolution
- Color and Color Profiles
- Booklet Printing
- Typography
- Production Time
- Envelope Printing
Print-Ready Files
To ensure your project is exactly what you’re expecting, we need properly formatted print-ready files to print from. If your document is print-ready, all that is required for production is to hit PRINT. If there are any formatting changes or editing required, your file is not print ready and will incur formatting fees. You will be notified upon submission if your file is not print ready and given the opportunity to choose between resubmitting a corrected file or having us fix your file and paying for formatting.
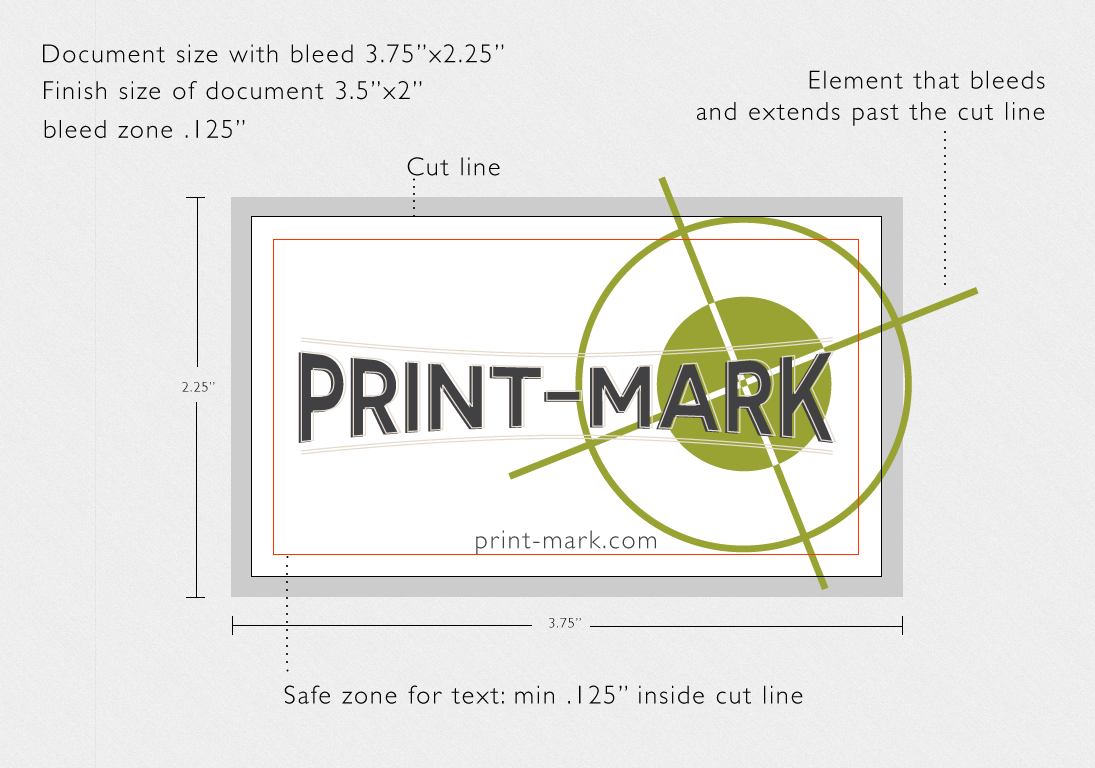
What is a Bleed?
In printing terminology, the bleed is the extra margin on a print product that is meant to be trimmed off when the product is trimmed to its final size. Bleed basically means that the color and graphics on a product “bleed off the page” to ensure continuity of the color to the edge of your product.For the best results, please download the product templates from our download templates page.
A full bleed is required for all print files.
How to Setup a bleed:
Adobe Illustrator
File > Document Setup > Bleed .125″
Adobe InDesign
File > Document Setup > Bleed .125″
Adobe Photoshop
Make your canvas size .25″ larger vertically and horizontally
Acceptable File Types
All files must be converted to .pdf or .jpg before submission in order to achieve the desired results. PDF (Portable Document Format) is the most preferred file format to be set in pre-press quality. It is ideal for viewing on multiple computers, because it preserves the formatting, fonts, and other elements within the document on different computers, as well as when it is printed.
The maximum file size for uploads is 50 MB.
Before uploading your file, make sure to check the image size to ensure your file is the size you’re wanting. In Photoshop, click on Image > Image Size, and proportion your image correctly. To reduce file size, please upload in properly sized .jpg format.
All programs allow you to “Save As” or “Export” to a .pdf file.
Proper Layout and Formatting
Proper layout of files is essential to make sure your finished product is what you’re expecting. Details like inserting blank pages where necessary when printing double sided and creating a document in spreads but exporting it as pages for printing must be thought through and processed for success.
Size: Make your file the size want. For example, if you want a 5×7 card, your .pdf file must be 5×7. Depending on the program you’re using, typically going to File > Document Setup will allow you to change the page/artboard/canvas size.
Orientation: All pages in your document must be the same orientation, especially when printing double sided. If some pages are landscape and others are portrait, the output documents may not align properly once printed.
Why is my image pixelated?
Resolution is also known as dpi (dots per inch) or ppi (pixels per inch). It indicates the number of colored dots or pixels that make up one image. The higher the dots per inch/pixels per inch, the greater the resolution and the clearer the resulting final print will be.
In order for an image to print correctly, all file formats must be submitted at a resolution of 300 dpi at 100% of the final print size. When file resolution is lower than 300 dpi, the final print will have a substantial drop in the image quality.
Monitor resolution (72 DPI) is much lower than the resolution of printers, so just because an image looks sharp on the screen, doesn’t mean it will print well. Your original file needs to be created at a resolution of 300 dpi. If a file is created at a low resolution and manually changed to a higher resolution, it will not change the quality of the image. The only difference it would make is that the file would be rescaled, and the density of the pixels or dots would change, not the number of dots or pixels in the file.
The Color looks good on my monitor?!
We require that you provide us with print-ready digital files in CMYK color mode. Provide all black and white artwork in grayscale color mode if you’re wanting grayscale. RGB color modes will convert to CMYK which will produce dramatically different results.
In print mediums, RGB colors will not be as vibrant as they appear on-screen. CMYK colors are more accurate on screen and in print because it has a more limited range of possible colors. Both color modes must be properly converted using various design softwares in order to produce true colors. Colors viewed both on screen and in print mediums will vary.
Booklet Printing
Saddle Stitching is a process in which loose sheets of paper are imposed into signatures, printed as double sided loose sheets, then folded in half and inserted within each other, where the fold becomes the spine of the product where it will be bound. The product is then stapled through the spine, holding the sheets of paper in place. Saddle stitch binding is used for little booklets and newsletters and is essentially used for products that do not have a high volume of pages.
When designing booklets, it is easiest to use InDesign. Set up your files as spreads and design accordingly (including the bleed). Once completed, your file must be exported as pages, not spreads, so your file can be imposed properly for printing purposes. Your file must contain a multiple of 4 pages (4,8,12,16…) in order for the file to layout properly. If you do not have a multiple of 4 pages, extra blank pages will be inserted at the end of your document for printing.
Typefaces and Fonts
In typography, a typeface is the design of the set of characters. Times New Roman is one typeface, Arial is another. There are many different categories of typefaces, including: Roman (Serif, Sans-serif, Script, Ornamental), Blackletter, Gaelic, Monospaced, Symbol.
A font is a set of characters in a particular size and typeface. For example, within the typeface Times New Roman, is a series of fonts. Times New Roman in 20 pt. is a font, and Times New Roman in 16 pt. is another font. Times New Roman in 16 pt., Bold and Italic is yet another. In other words, a font is a member of a typeface family, and designates the size and style of the typeface.
In order to ensure your fonts are not substituted going from computer to computer, they must be embedded. Embedding a font means storing your font information in the file so that when your file is opened on a different computer, the fonts do not vary in appearance. If your fonts are not embedded, a different font may be substituted for your document. To prevent these variations, embed all your fonts in PDF files or convert them to outlines.
How long will it take?
We pride ourselves on printing your job faster than anyone around! Typical turn time is 24 hrs for quantities under 500.
Signage: 2 weeks
Orders over 1000: 3 days minimum.
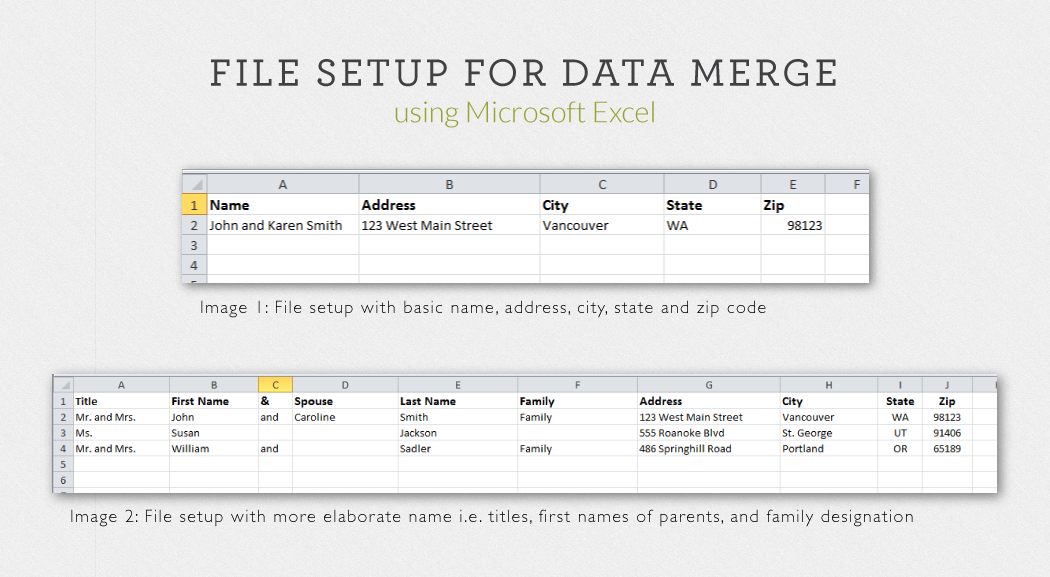
Can I print on envelopes?
To print addresses on envelopes, we need an excel file formatted in the following way:
Column 1: Name Column 2: Address Column 3: City Column 4: State Column 5: Zip
Type each entry exactly how you want it to appear on the envelopes. In the excel document the font and point size do not matter as it will be changed within the program used to create the merged document.
Files not set up properly will incur formatting charges.